How do I build a self-hosted node server
Please note that we only support Ubuntu 22.04
Self-hosted mode
We provide 2 self-hosted mode: audit, local
Audit Mode
Audit mode that allows you to audit all communication between your devices and Web3Password Server. But your node server does not keep any data, all encryption data will send to Web3Password Server to keep.
-
If you enter your Mnemonic Phrase in your self-hosted server, you even could decrypt all communication data about you. And watch all these data as plaintext.
-
In this mode, you could known that Web3Password does not have any backdoors or unauthorised actions.
Local Mode(Coming soon)
Local mode that allows you to keep data by yourself.
-
You could keep record data on your node server. Only a few data about account will transmit to Web3Password Server in this mode.
-
Your are responsible for encuring the reliability of your server. Any damage has nothing to do with Web3Password in this mode.
How to run as Audit mode
You go to github.com and download our latest version Satis Binary. Satis is our access layer service. It's Open Source, so you could read our source code about satis on github. Also, you could compile a new binary using our source code.
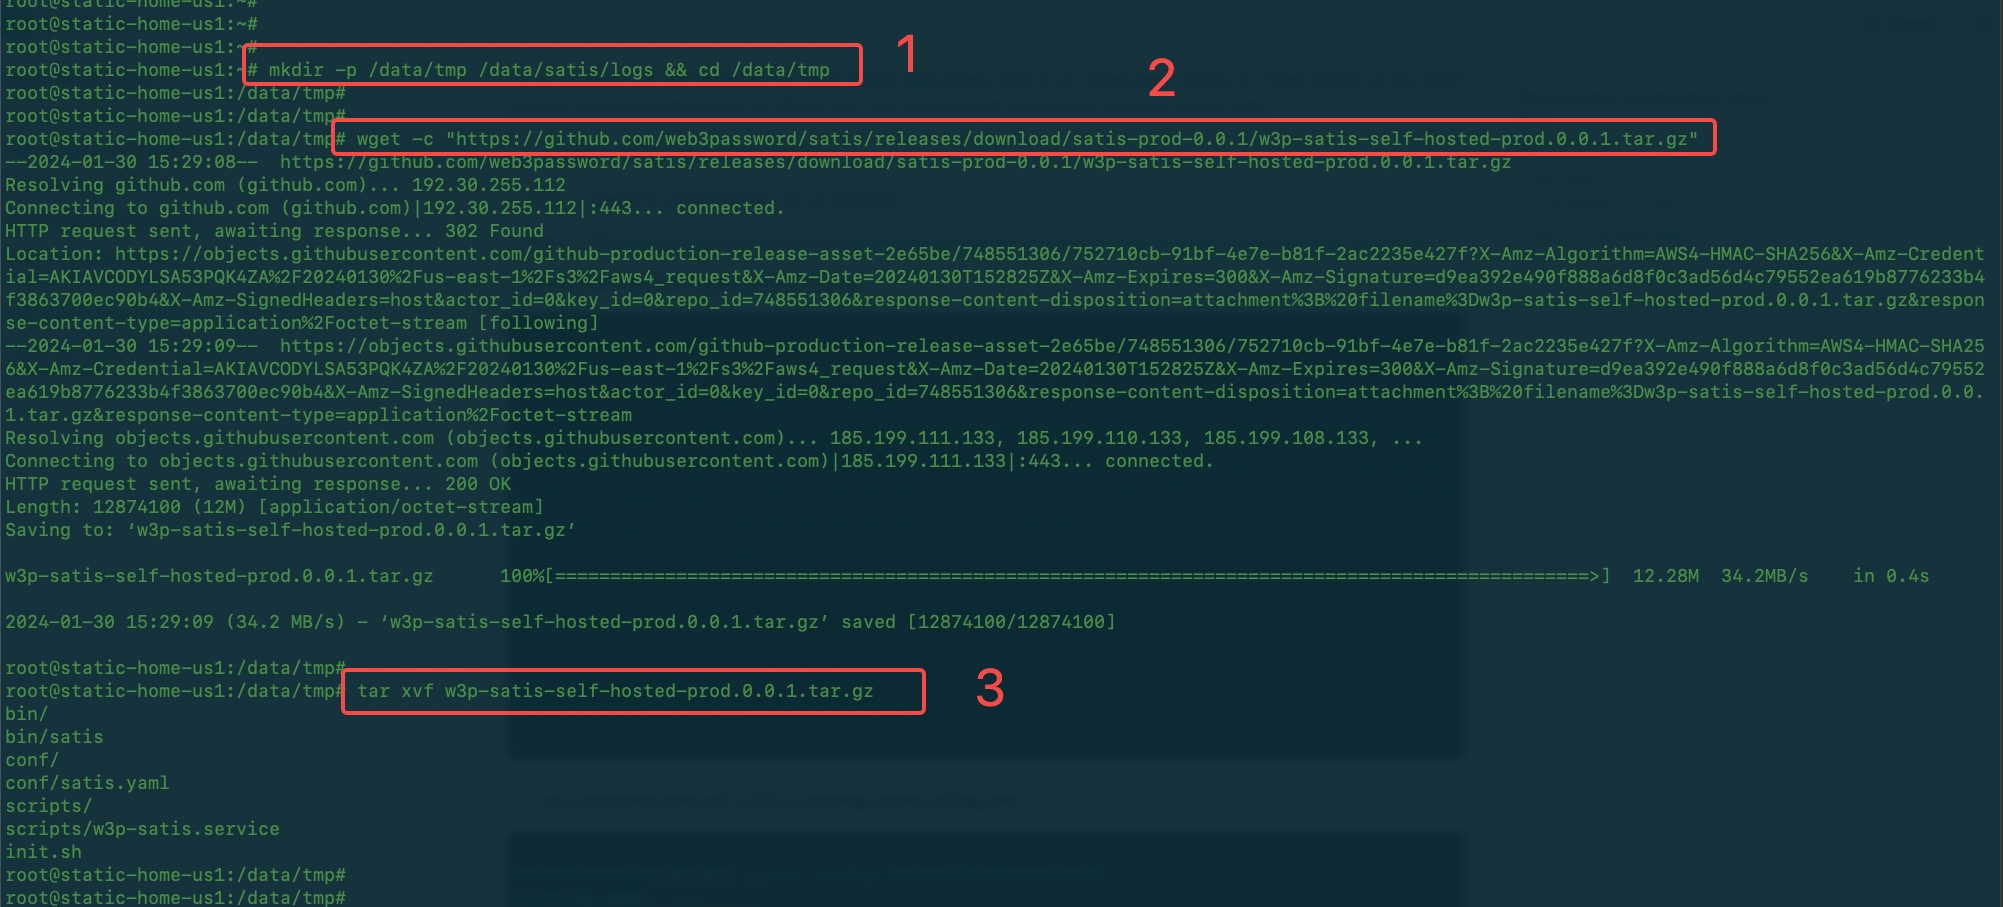
- get the tar archive file and uncompress it
mkdir -p /data/tmp /data/satis/logs && cd /data/tmp
tar xvf w3p-satis-self-hosted-prod.0.0.1.tar.gz
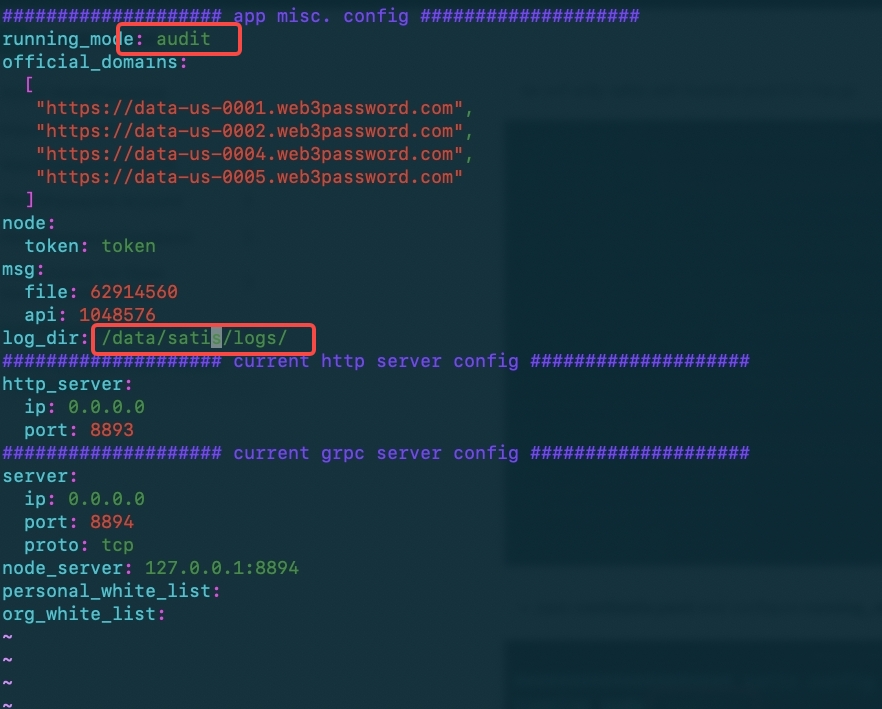
- open conf/satis.yaml and configure running_mode and log_dirs
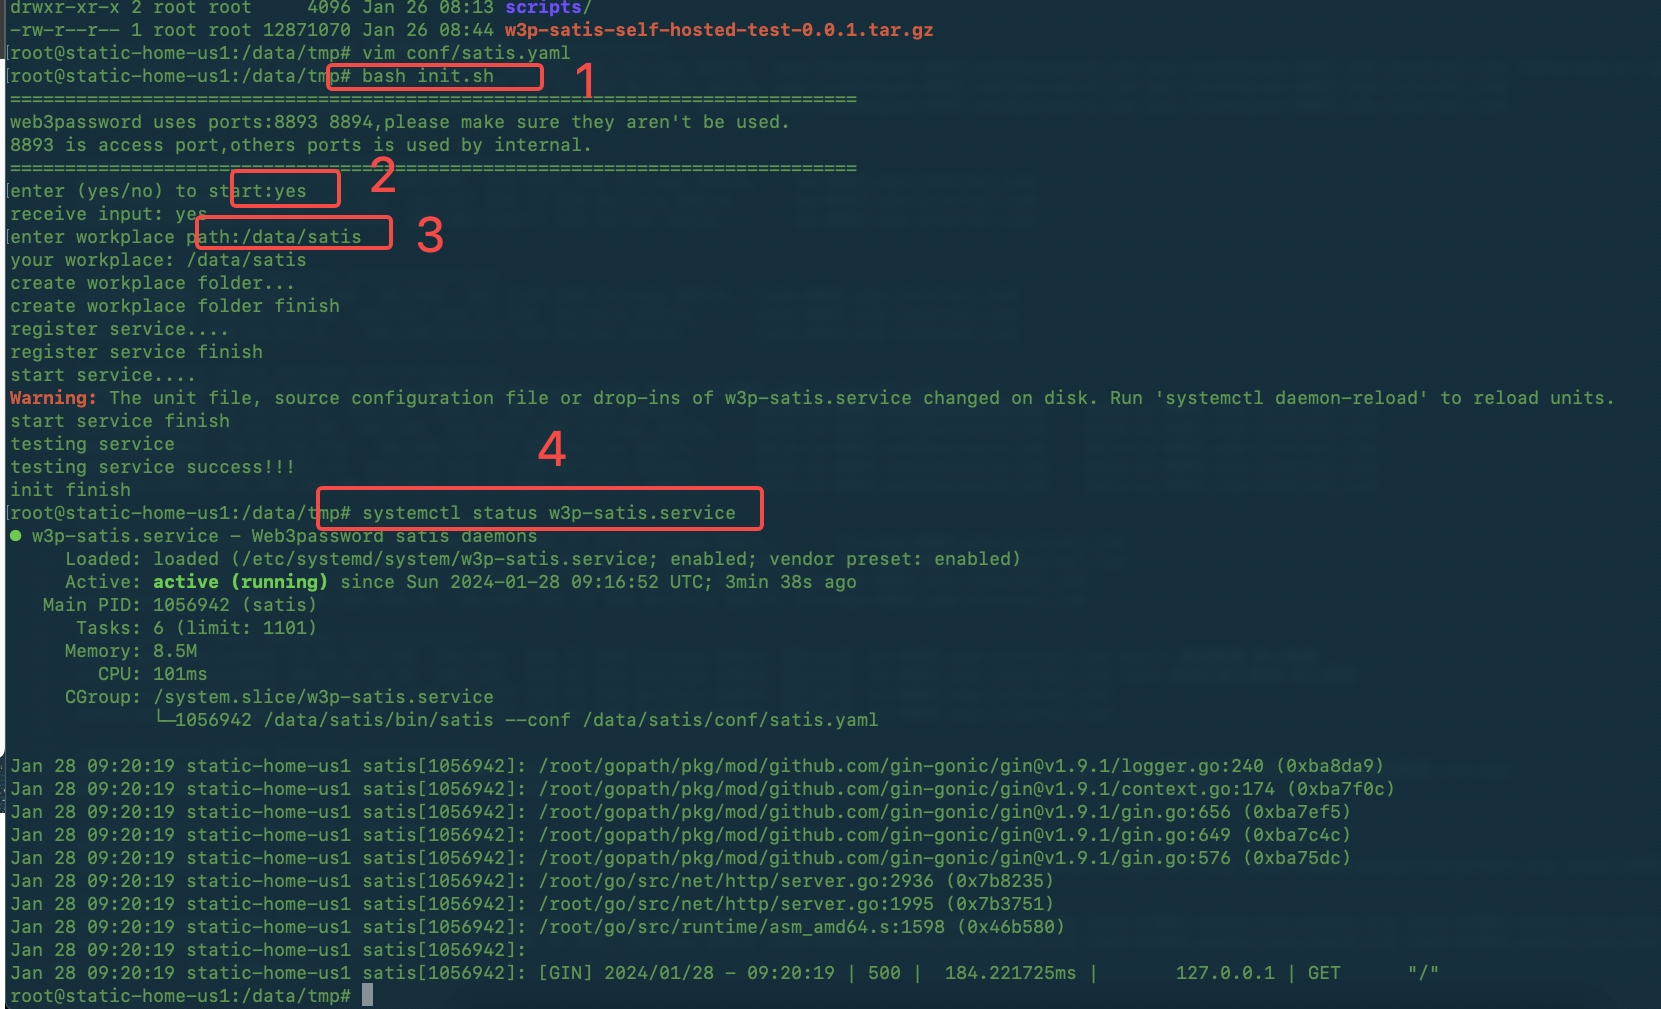
- execute bash init.sh command,then enter yes and /data/satis as your work path, you could watch the service status using systemctl status w3p-satis
-
The satis service is running on http port 8893 and grpc port 8894, so we could use a reverse proxy to connect it.
-
Install a nginx service, and then configure it with satis service.
server {
    listen 80;
    server_name HERE-IS-YOUR-DOMAIN;

    location / {
	    return 301 https://$host$request_uri;
    }
}
server {
    listen 443 ssl http2;
    ssl_protocols         TLSv1.3;
    ssl_ciphers ECDHE-ECDSA-AES256-GCM-SHA384:ECDHE-RSA-AES256-GCM-SHA384:ECDHE-ECDSA-CHACHA20-POLY1305:ECDHE-RSA-CHACHA20-POLY1305:ECDHE-ECDSA-AES256-SHA384:ECDHE-RSA-AES256-SHA384:ECDHE-ECDSA-AES256-SHA:ECDHE-RSA-AES256-SHA:!NULL:!aNULL:!eNULL:!LOW:!3DES:!MD5:!EXP:!CBC:!EDH:!kEDH:!PSK:!SRP:!kECDH:!RC4:!EXPORT:!EXP:!ADH:!SHA1:!DES:!CAMELLIA:HIGH;
    ssl_prefer_server_ciphers on;
    add_header Strict-Transport-Security "max-age=63072000" always;

    ssl_certificate /etc/letsencrypt/live/HERE-IS-YOUR-DOMAIN/fullchain.pem;
    ssl_certificate_key /etc/letsencrypt/live/HERE-IS-YOUR-DOMAIN/privkey.pem;
    server_name HERE-IS-YOUR-DOMAIN;

    access_log  /data/logs/nginx/access_HERE-IS-YOUR-DOMAIN.log;
    error_log /data/logs/nginx/error_HERE-IS-YOUR-DOMAIN.log;

    client_header_timeout 1w;
    keepalive_timeout 1w;

    add_header Access-Control-Allow-Origin '*';
    add_header Access-Control-Allow-Credentials "true";
    add_header Access-Control-Allow-Methods 'GET, POST, OPTIONS';
    add_header Access-Control-Allow-Headers  'token,DNT,X-Mx-ReqToken,Keep-Alive,User-Agent,XRequested-With';

    location / {
	    # satis http port 8893
        proxy_pass http://127.0.0.1:8893;
        proxy_http_version 1.1;
        proxy_set_header Upgrade $http_upgrade;
        proxy_set_header Connection "upgrade";
        proxy_set_header Host $http_host;
        proxy_redirect off;

        proxy_connect_timeout 5s;
        proxy_read_timeout 65s;
        proxy_send_timeout 65s;

        proxy_set_header X-Real-IP $remote_addr;
        proxy_set_header X-Forwarded-For $proxy_add_x_forwarded_for;
	    proxy_set_header X-Forwarded-Proto $scheme;
    }
}
- Of course, you could only use http if you don't have SSL. It has same security level in Web3Password Password Manager
- But your should known that if use http as your URL, Web3Password Browser Extension will not work in many HTTPS Websites because Browser prohibits this
server {
    listen 80;
    server_name HERE-IS-YOUR-DOMAIN-OR-IP;

    access_log  /data/logs/nginx/access_HERE-IS-YOUR-DOMAIN-OR-IP.log;
    error_log /data/logs/nginx/error_HERE-IS-YOUR-DOMAIN-OR-IP.log;

    client_header_timeout 1w;
    keepalive_timeout 1w;

    add_header Access-Control-Allow-Origin '*';
    add_header Access-Control-Allow-Credentials "true";
    add_header Access-Control-Allow-Methods 'GET, POST, OPTIONS';
    add_header Access-Control-Allow-Headers  'token,DNT,X-Mx-ReqToken,Keep-Alive,User-Agent,XRequested-With';

    location / {
	    # satis http port 8893
        proxy_pass http://127.0.0.1:8893;
        proxy_http_version 1.1;
        proxy_set_header Upgrade $http_upgrade;
        proxy_set_header Connection "upgrade";
        proxy_set_header Host $http_host;
        proxy_redirect off;

        proxy_connect_timeout 5s;
        proxy_read_timeout 65s;
        proxy_send_timeout 65s;

        proxy_set_header X-Real-IP $remote_addr;
        proxy_set_header X-Forwarded-For $proxy_add_x_forwarded_for;
	    proxy_set_header X-Forwarded-Proto $scheme;
    }
}
-
Then, just configure your device setting -> self-hosted -> Server URL, Enter your DOMAIN or IP.
-
Go to our Protocol, and get the repository.
git clone https://github.com/web3password/web3password-protocol.git
cd web3password-protocol
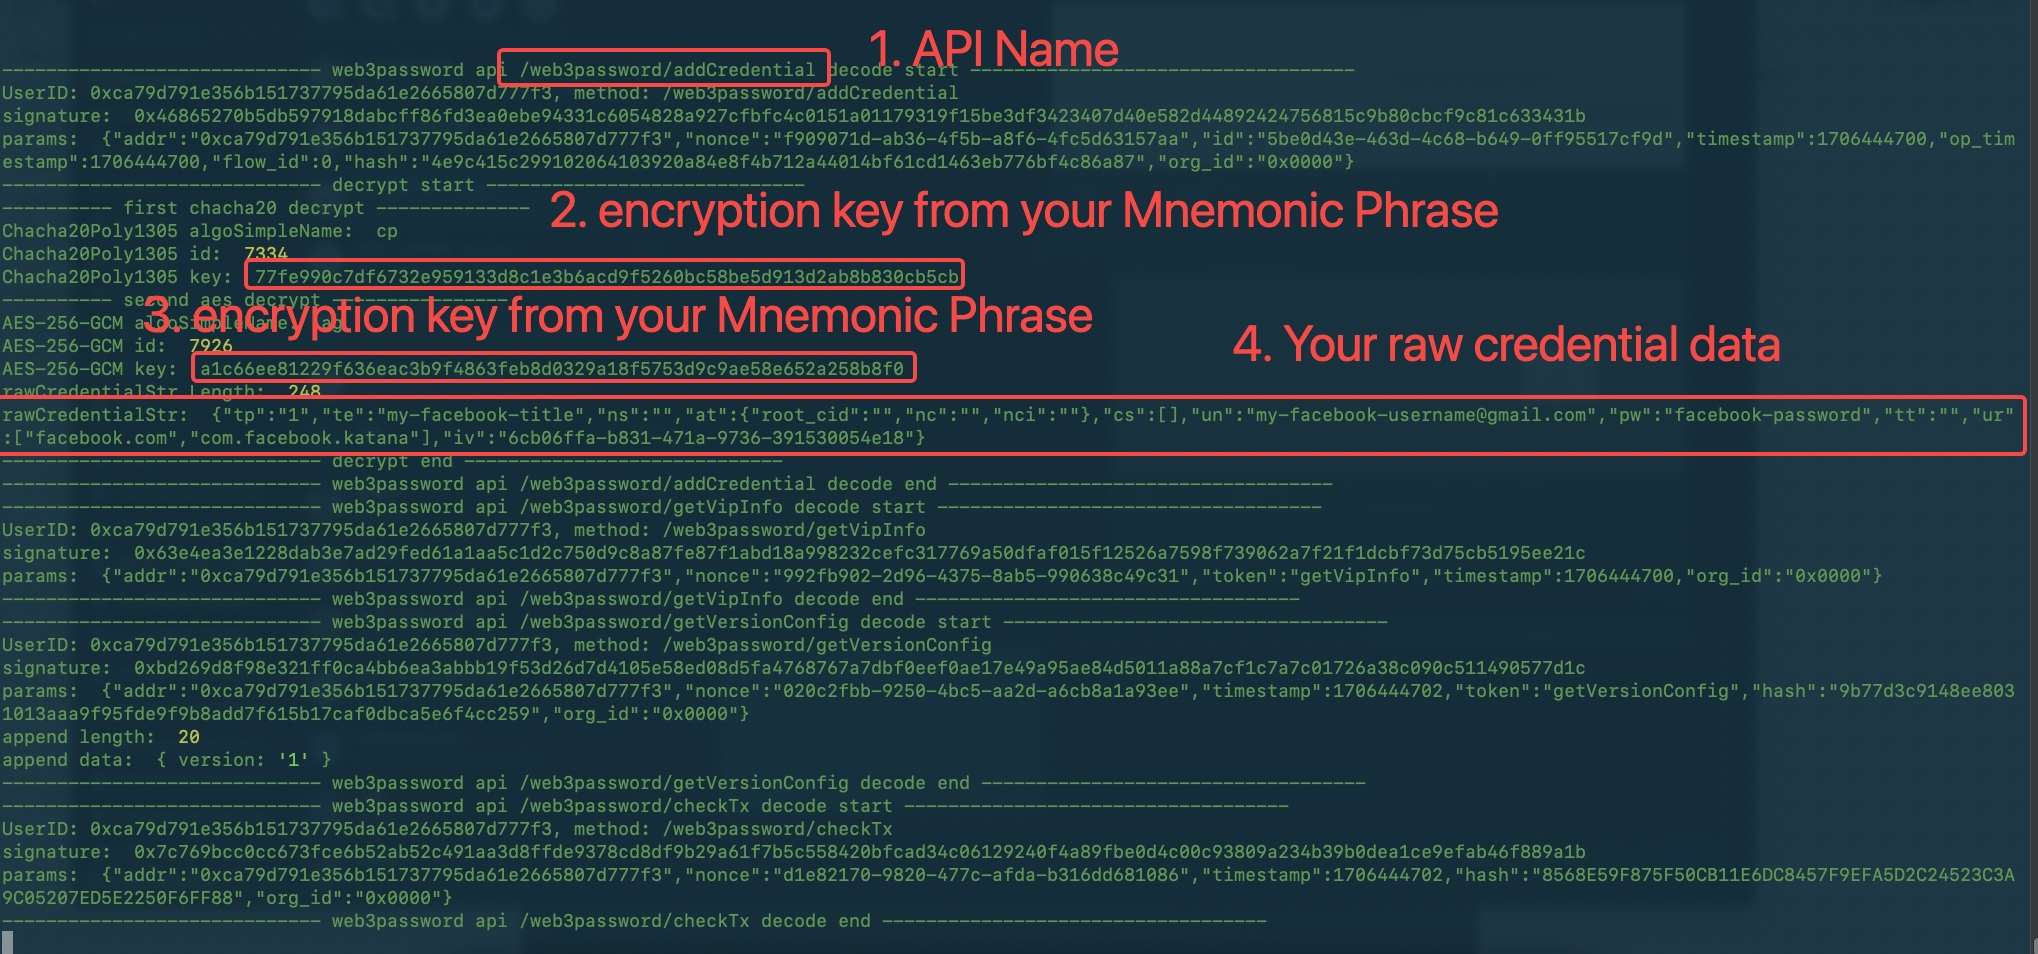
bash audit.sh "YOUR-MNEMONIC-PHRASE" "Satis-logfile"
- Then you will watch many decode/decryption log on your server terminal as below.